User Guide - Detailed Functionality
This section covers a number of specific topics. Before worrying too much about these details it will be worthwhile gaining familiarity with Adjudicate by running through the getting started guide and experimenting a bit with the software.
The software is under constant improvement which may include the alteration of functionality which may not be immediately updated here. Please be aware that some screenshots may change and some steps may alter over time.
This guide will not cover every last detail of the software. If you find an omission that you think is worthwhile adding please use the contact page on this web site to let us know.
Event Structure
Adjudicate introduces a number of concepts in order to structure the data which needs to be handled throughout a pentathlon event. These may not be exactly the names you attribute but in the interest of clarity we will use the same names throughout.
- Tournament: This is simply a container to group multiple competitions. Adjudicate can have one tournament open at any one time. Opening a second tournament means the first tournament needs to be closed. The tournament is saved to an .adjx file where all child objects (as listed below) are held in the correct place in the tournament's structural hierarchy.
The tournament admin screen is relatively basic. However it is possible to apply a setting here to prevent duplicate competitor numbers within competitions. Duplicate competitor numbers are allowed across classes under different competitions. Duplicate competitor numbers are never allowed within the same class. This setting (which is enabled by default) decides if it is possible to use the same competitor number in classes within the same competition. Sometimes you want to enforce this and sometimes you may want more flexibility. - Competition: This is a container to group multiple classes. In most cases you will only need to have one competition in a single tournament but you may want to use competitions as a way to segregate biathletes from pentathletes, for instance. It is possible to add teams to a competition. The competitors in the teams must come from classes that are children of the competition. Adding teams to competitions allows, for example, a mixed team competition with competitors from both a male and female class. At present only one team competition can be added to each competition so if you require multiple mixed classes you will need to use multiple competition to contain the appropriate classes to facilitate the mixed team competitions you require.
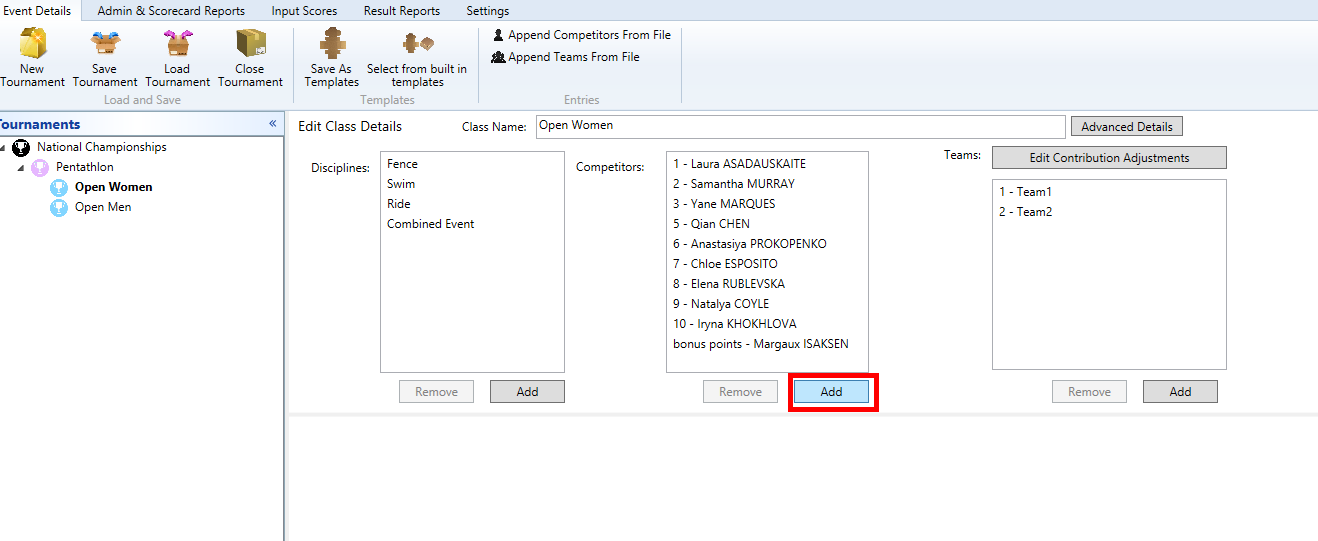
- Class: Each Adjudicate class represents a class in your competition. You will need one of these for each class in your competition and they will need to be setup with the correct disciplines and rules that you want to apply as well as with competitors and teams. The class admin page (shown below) requires disciplines to be set up as well as competitors. Teams can also be added here if a team competition is required.
- Discipline: These are the sports that competitors are taking part in. Each discipline (e.g. swim, fence, combined event) is added to the classes. They can be added from the class admin page as shown above. The process for adding these is described below. Once they are added clicking on each one in turn brings up the appropriate admin page in the lower panel. From here scoring rules can be set up. These will be dealt with in turn below.
- Competitor: These are the people competing. They can be added either with the bulk import process described below or by clicking the add button to add them one by one. Once they are added, they can be edited by clicking on the correct one from the list. The competitor's admin page will appear in the lower panel
- Team: Teams are simply defined as a list of competitors. They are typically added to a class but team competitions can be set at the competition level of the hierarchy in order to allow teams to be made up of competitors from more than one class (e.g. a mixed ladies and gents team competition). Teams can be imported in bulk from a file as described below or one by one using the add button below the team list in either the competition or class admin panels.

The custom adjustments button visible in this screenshot allows adjustments to the team results and is described in its own section in this user guide.
The custom adjustments button, visible in this screenshot, allows adjustments to the individual and team results and is described in its own section in this user guide.
Guide around the user interface
The user interface is made up of a ribbon bar at the top of the application, a tournament explorer to the left and a main panel in the middle. The content of the main panel will vary with sensitivity to what is selected in the tournament explorer and what is selected from the ribbon.
For instance, to input scores for a particular class select the class you are interested in from the tournament explorer and select the Input Scores ribbon tab; if competitors and disciplines have been set up then you will be able to enter scores here.
The status bar will display information, typically about the status of the autosave.
Settings
Clicking on the settings tab on the ribbon brings up the settings panel.
1. Licenses - License files can be provided, please use the contact page on this web site. Licenses can be applied or removed here. Please see the license section below for more information.
2. Automatic backups - the current tournament can be saved periodically to a designated folder. The settings panel allows you to disable this feature (not recommended). You can also change the location the files are saved to and the frequency they are saved. The files can be read back in to the application using the standard load button on the Event details tab.
3. Report History
In some cases when a report is generated it is saved to disk so that it may be easily retrieved by the software at a later date. The location where these are stored is called the report cache. In some cases you may want to clear the cache (for instance if you apply a new license key or want to clear up space on the disk). This can be done here.
Tournament Explorer
On the left side of the screen you can see the tournament explorer:
The top level (black icon) represent the tournament, the middle level (purple) represents the competitions and the bottom level (blue) represents the classes.
The selected item, highlighted in bold, works in conjunction with the ribbon control at the top of the page, options that are not available for a certain item type are greyed out and cannot be selected.
At the tournament level only event details and settings are available, clicking on the event details ribbon tab whilst the tournament is selected (or vice versa) displays the tournament admin page in the main panel.
At the competition level admin & scorecard reports are also available and reports can also be selected, this is because teams can be at completion level so team reports are available from these ribbon tabs.
At the class level all the ribbon controls become active (i.e. the remaining input scores tab becomes active) as scores are input at class level.
As well as being able to add and edit via the admin controls, it is possible to right-click on the tournament explorer items and bring up a context menu where items can be removed and child items can be added.
To edit the name of an item directly in the tournament explorer double-click the item.
Input Scores Screen
For the input scores screen to be usable a class must be selected with at least one discipline and competitor. The input panel displays a grid of all the competitors against the disciplines allowing entry of all scores, as they happen, on one handy screen.
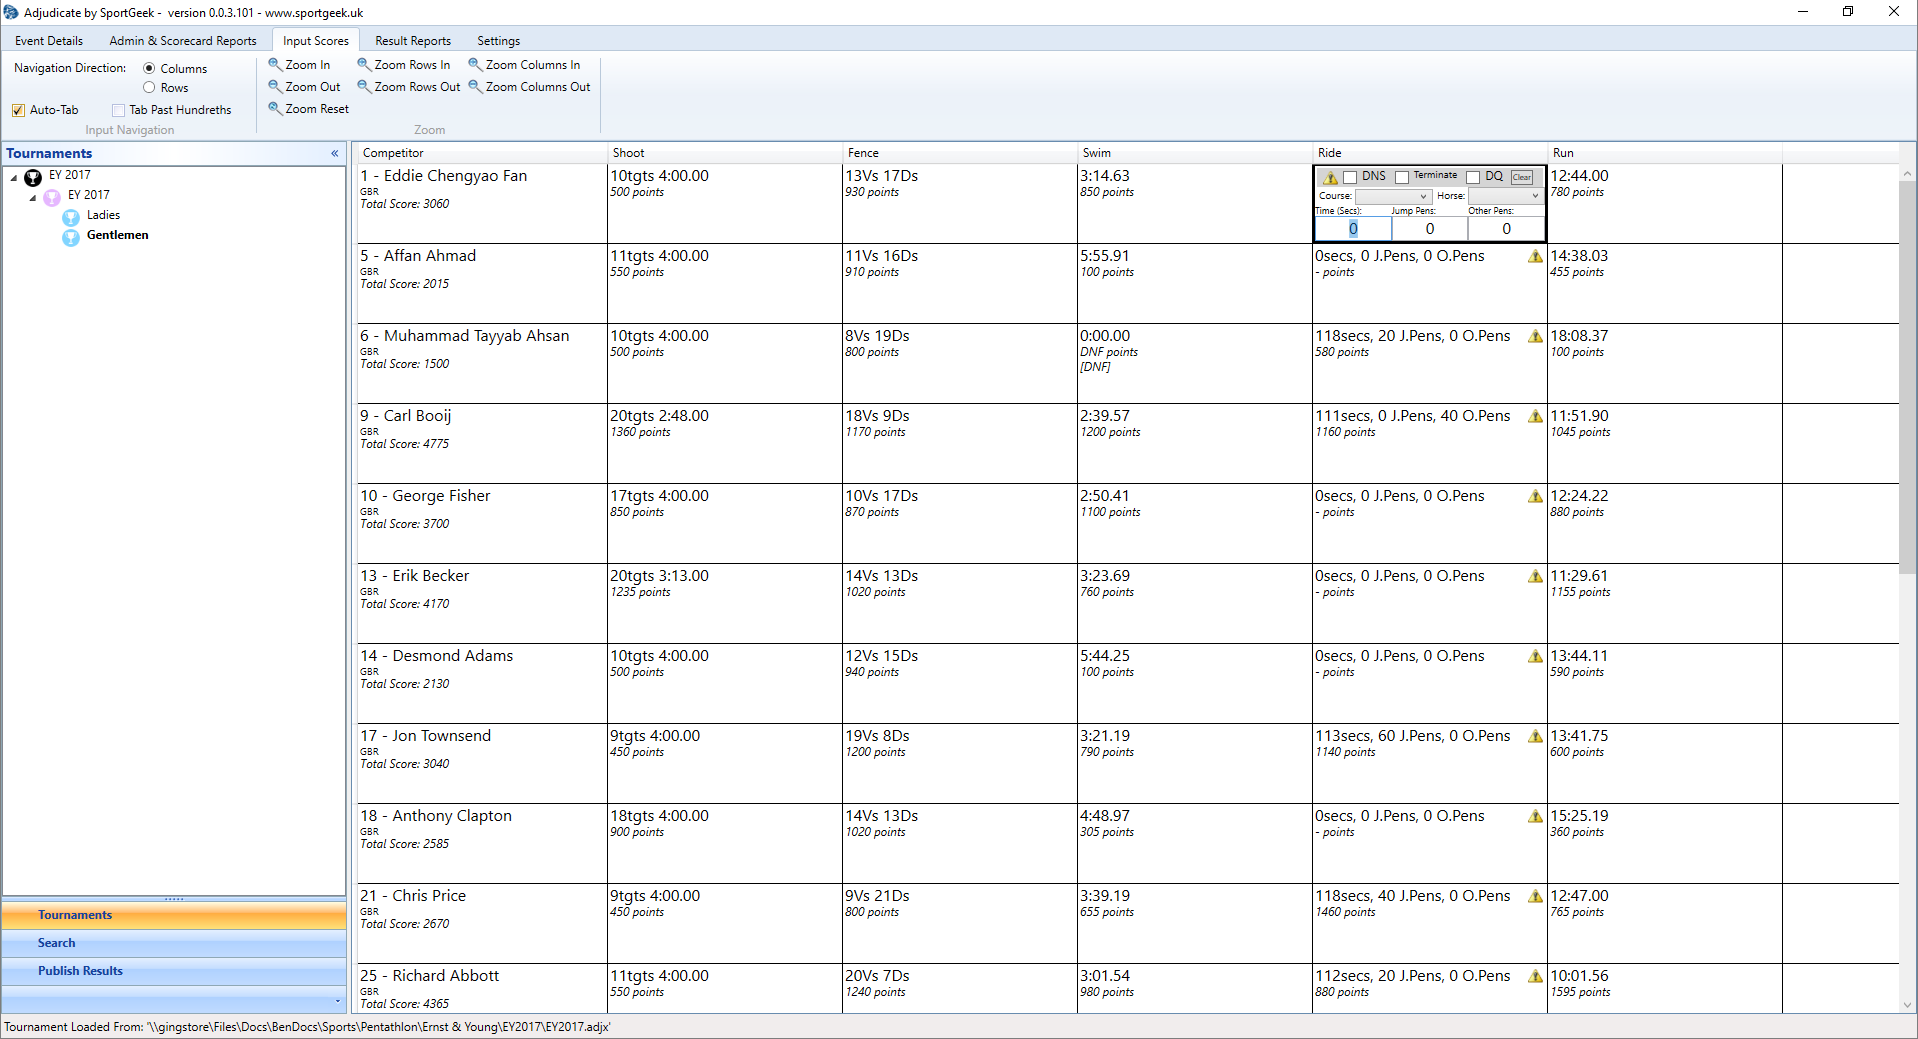
The ribbon includes some controls to alter the input panel. The input navigation group controls the behaviour when you press tab. You can tab down the columns (useful when you have all the results from one discipline) or across the rows (useful when you want to edit a particular competitor).
The autotab setting will, where possible, detect when you are done entering a value in a cell and tab to the next cell automatically. For instance, if you enter 2 in the minutes cell on a swim where the optimum time is 2 minutes 30 seconds then it is unlikely you are trying to type 20minutes, thus the seconds cell will be immediately selected so that you can enter the seconds. Similarly seconds must be between 0 and 59 so if you type 6, 7 8, 9 or a double digit number then you will automatically be tabbed on to the hundredths, in the hundredths column we know that we cannot have a three digit number so the next score will be selected after the second digit is entered. However, in a run event where the optimum is, for instance, 10 minutes. The 2 minutes would be an infeasible time so the software waits for you to type a second digit. This function can reduce the keystrokes required when entering data but can be switched off if you do not find it convenient; if you switch it off you can easily navigate between cells using the tab key as usual.
Right clicking on the input grid header row brings up a list of all the columns allowing you to show/hide individual column. This can be useful if you are concentrating on one discipline and want to remove the 'noise' of the other data.
Some input cells display a yellow warning triangle if something has been identified as not being set up correctly. For instance if a competitor has not been entered in a ride course. Hover over the triangle to display the message and make the correction if desired. These warnings can be ignored but may be indicating something which will cause an error in your results.
Fence Pool Sheet Input
Fence scores can be entered either as a final result or pool sheet by pool sheet. Clicking on the "..." button on any of the competitors' fence input cells brings up the pool sheet input dialog.

Once the dialog appears the pool, round and piste can be selected from the three drop downs. The appropriate pool sheet will appear with the cells editable to enter each hit value.
As an alternative to the drop downs the next button will take you to the next pool sheet, cycling through all the pool sheets in a the selected pool. The pool sheet dialog will also respond the to the auto-tab setting, when auto-tab is enabled each cell assumes a single digit is required and automatically tabs on to the next cell when it receives this key press. When the last cell is reached the next button is selected. This method makes it particularly efficient to enter the fence results when the pool sheets ar sorted in order as the key presses required as simply the values of the hits scored followed by enter, to go to the next pool sheet
When the pool sheets are used to enter the results the score is saved against the opposing fencer and not as a hit in a particular round. This means that if the fence structure is alterd during the fencing pool (most typically if a competitor drops out) then the teams can be altered in the fence admin dialog and the pool sheets will automatically adjust without loosing the results so far even if the changes mean that the pool sheets have fundamentally changed or teams have been altered.
When pool sheets are used to enter the fence score the total score is calculated based on those opponents who are in pool AND in a fence team. So that if a competitor is removed from the fence event then they should be removed from their team and all the hits scored against them will be automatically subtracted. It is worth noting that the scores are not permanently removed and if the competitor is placed back in a team in the pool their hits will not need re-entering.
The fence score defaults to having victories overridden (i.e. a single total hits value entered). As soon as a score is marked on a pool sheet both the fencer and their opponent will automatically have their score determined by the results entered in the pool sheet. If it becomes desirable to revert to entering a single total hits value then the override checkbox in the victories cell can be rechecked and an override value enterd so that the hits entered on the pool sheets will then be ignored.
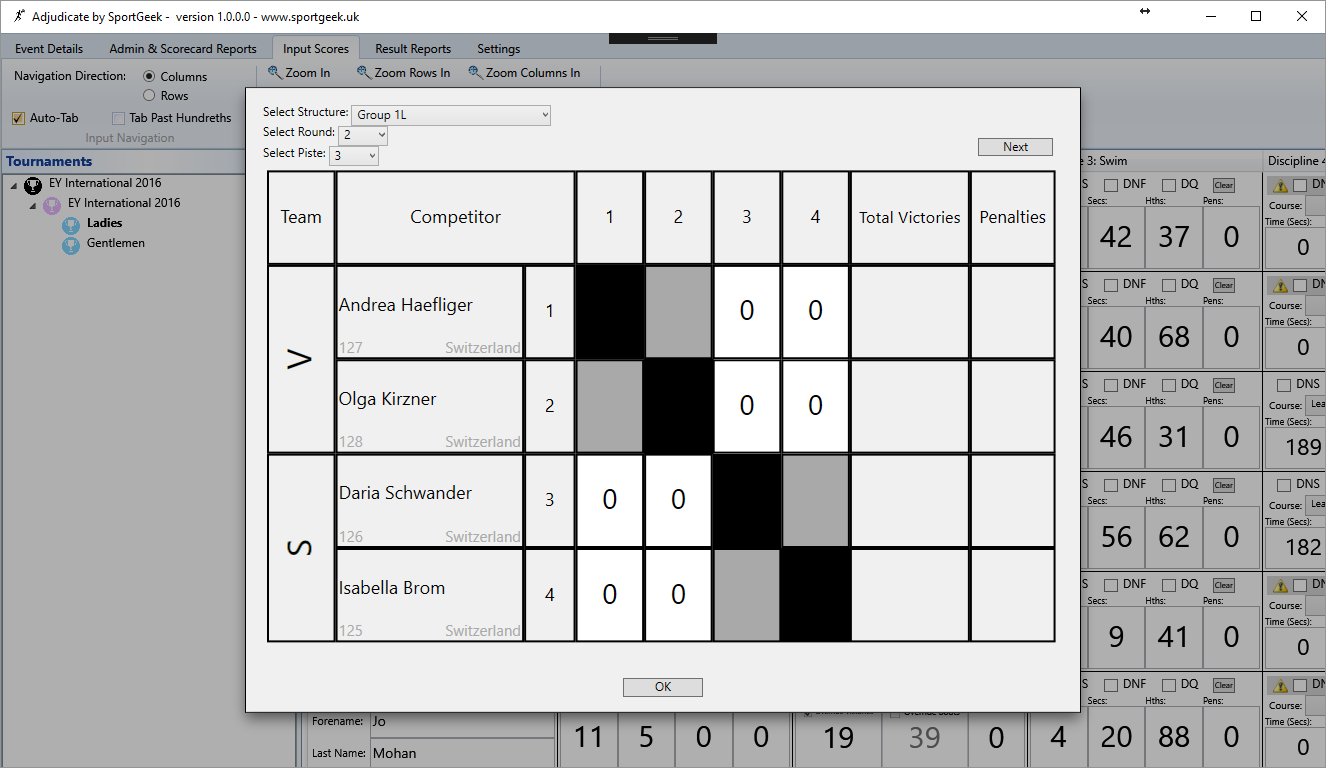
Heat Based Input
Other events can also have scores input in alignment with the event's structure. For example, the ride in the order that people go in the arena, and physical events heat by heat.
Similar to the fence pool sheet breakdown, click on the "..." button in the corner of any competitor's input for the discipline you are interested in. If possible, the competitor you selected will be found and will be the default for entry.
Select the structure you want to enter data for, if there is a further breakdown into heats then this will also be available for selection.
The tab stop settings from the main input ribbon (such as auto tab and tab past hundreths) will also apply to the heat based entry screen.
Once finished, select the "OK" button to close the dialog and return to the main input screen.
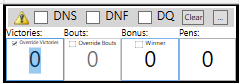
DNS, DNF and DQ

At the top of every input control are DNS, DNF and DQ checkboxes enabling override of the score. There is also a button to clear the override and reinstate the score that has been entered
DNS - Did not start
DNF - Did not finish
DQ - Disqualified
The rules of pentathlon state that if a competitor does not start a discipline then they are not permitted to compete in further disciplines and they will be effectively disqualified from the event. In the results output this will be indicated will a hyphen in the total column and they will be placed as if they have scored 0.
If the competitor is disqualified at any time then their competition is terminated and DQ is displayed in their total column and they are placed last.
If a competitor does not finish then they remain in the competition but are awarded 0 points for this discipline (or the minimum points for participation, if applicable).
Search Panel
As an alternative, potentially quicker, way of finding a competitor and entering their results data the search panel is accessed either by selecting the "Search" panel on the left-hand side or by pressing F3. As you type the search results will be filtered down; the search can be based on competitor number, competitor name or club name.
The competitors which match the search are listed with a "go" button, clicking on the button brings up the input dialog as a popup for that competitor where their results can be entered directly.

Result Report Screen
The results reports screen is used to create individual and team result reports. If all the relevant data has been entered just click on the button and wait a few seconds for the reports to be generated.The score summary option checkbox adds a section below the header of the individual report describing in words the scoring system that has been configured. It is optional to display this on the report but can also be useful to check that the scoring is configured how you expect. Confirmation of this with the competition director may be wise.

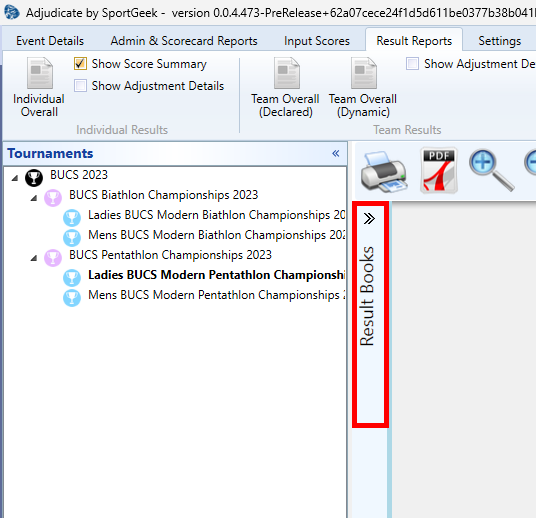
Result Books
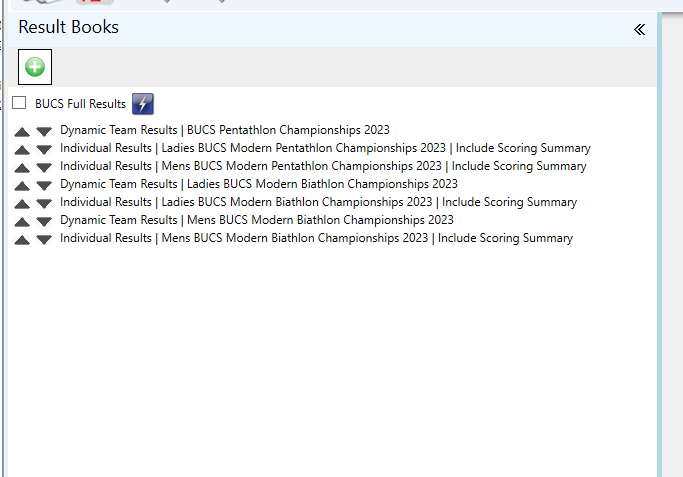
Groups of result reports can be defined into "Result Books". The result book panel is collapsed by default. Expand the panel to define new result books and edit existing ones.
Once expanded the green plus button can be pressed to create a new result book. Once created the name of the book can be edited by double clicking on the text. To add new reports to the report book check the checkbox and create the report in the usual way. Each time a report is generated it will be added to all the books that are currently checked. Once several reports have been added the "generate" lighting bolt button will collate all the reports into one book. This will be generted in the report viewer in the usual way ready for printing or export to PDF.
The reports can be reordered by clicking the up down arrows. Settings applied to the reports can be changed by right-clicking on the individal report. This context menu also allow you to remove the report from the result book.
Competition level team setup
As well as having team competitions for a class it may be desirable to have a team competition for a more than one class (for instance mixed teams). This can be done by clicking on the competition in the tournament explorer and selecting the event details ribbon tab. From here you can add teams using competitor numbers from the competition's sub classes. If the tournament is not set to prevent duplicate competitor numbers within competition then if you type in a competitor number that is used in multiple classes you will be prompted to select the one you want.
Once the teams are setup you will be able to create team reports by selecting the result reports ribbon tab and clicking the team overall button exactly the same as you would for a class, just ensure the competition is selected in the tournament explorer when you do.
Bulk File Import
The getting started guide ran quickly through the process for importing competitors from a csv or excel file in order to efficiently populate the competitors and teams in a class or competition.
The following buttons on the event details ribbon will be active whenever it is possible to add competitors or teams.
When a tournament is selected from the tournament explorer neither buttons are active, when a competition is selected only the teams button is active and when a class is selected both buttons are active. This is because all competitors must be added to a class and each class can also have a team competition using competitors from within the class. Additionally, we can add teams to a competition which using competitors from the classes that are in the same competition.
Once we click the button we are presented with the open file dialog from which we can select either excel file or csv files by using the drop down.
If we open an Excel file the "select source data" combobox at the top of the dialog allows selection of different worksheets within the workbook that you have opened.
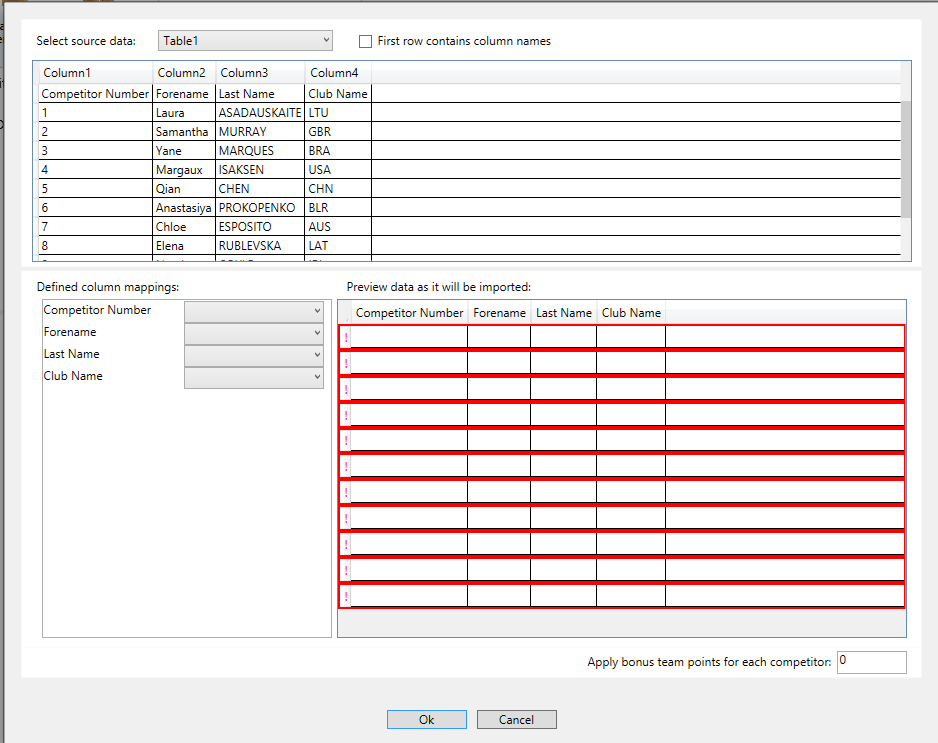
If the format of the data is a table with column headers in the first row then you can select "First row contains column names" to use the column headers. If not then the columns are picked by number.
It is possible to select each row, representing a competitor, from the grid at the top by clicking with the mouse and holding down shift for a continuous range and ctrl for a non-continuous range. The columns are mapped using the drop downs from the bottom left. You can optionally use "Competitor Number", "Forename", "Last Name" and "Club Name" as column headers in the file and adjudicate will recognise them and automatically map then to the correct fields.
Sometimes data is formatted with a single column with the full name. In this case just map it to forename and leave the last name blank. This will still display correctly in the reports.
The bottom right grid shows a preview of the data to be imported, scroll down and check that all is well. Errors are highlighted with a red box and exclamation mark. Hover over the row to see a tooltip describing the issue. Most common will be that the competitor number must be non-blank and suitably unique.
Competitors can also be imported in bulk into classes which already contain a number of competitors using these step, this is useful if additional competitors are added to the competition. However, for one or two additional competitors it may be easier to click "Add" just beneath the competitor list on the class admin page
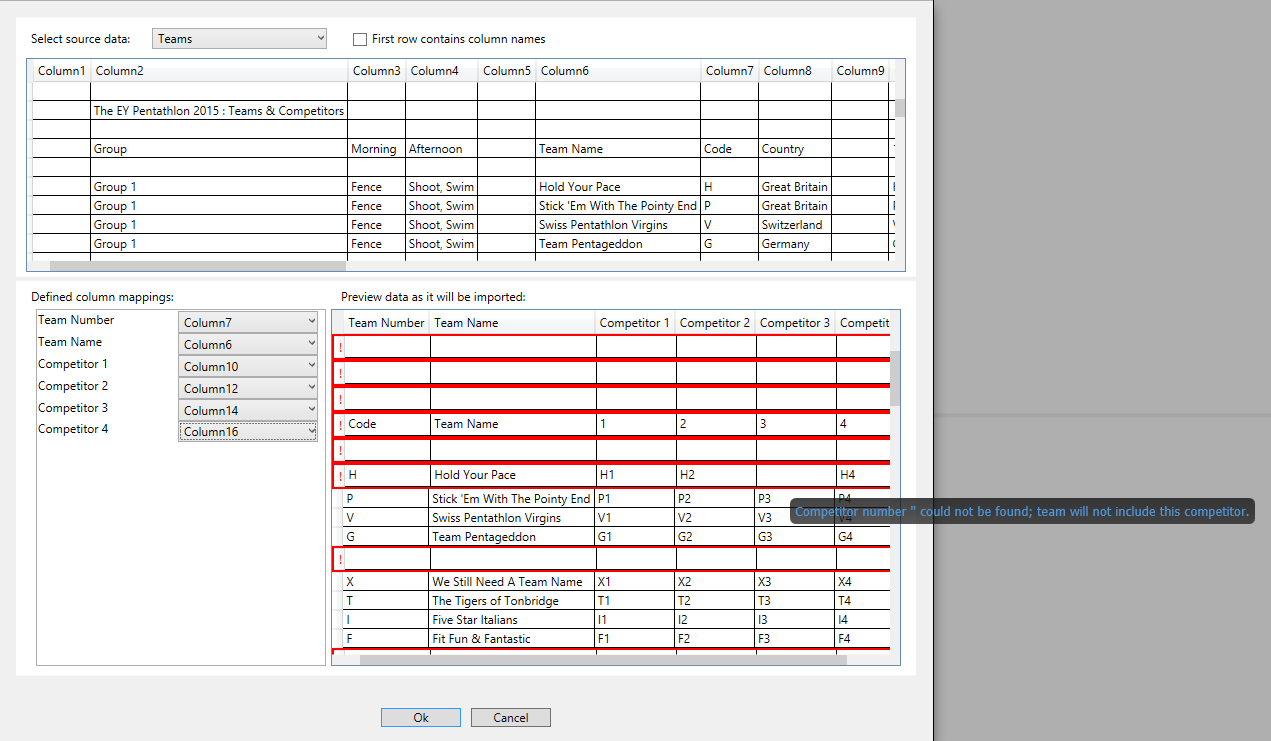
Team import is performed by following the same steps (except using the "Append Teams From File" button). A team file needs to include the columns for team number (this can be an arbitrary unique number if the competition does not assign numbers to teams normally), the team name, and the competitor numbers of the competitors in the team. These columns are mapped using the same dialog as for competitors. As you can see below, it may not be necessary to clean up your file or even to select the clean rows as adjudicate will highlight problem rows in red and will not import them whilst rows without problems will still import correctly. Check the preview grid for unintentional error and hover over the row to see a tooltip detailing why the row cannot be converted into a team.
Seedings
Competitor seedings can be imported along with the competitors by adding extra columns in the file competitor import dialog as follows: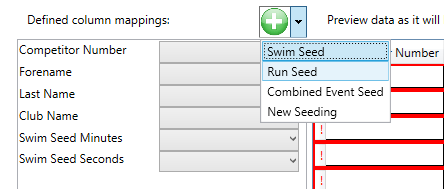
The available seeds can be edited by selecting the tournament node in the tournament explorer whist on the event details tab:
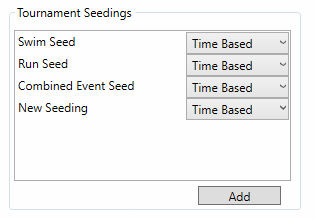
Note that currently (June 2016: v0.0.2.577) only time based seeding is possible. In future, group based seedings and rank based seedings will be introduced.
The seedings can be used to generate swim, run or CE heats. The number of lanes can be selected (if there are no lanes, then this is the number of competitors maximum in each heat). Labels can be made unavailable (for instance if the swimming pool outside lanes are not being used) and any of the available seeds can be used to re-seed the heats automatically. The method for ordering the competitors within a heat can be changed by clicking on the settings icon (the cogs icon in the top right-hand corner of the heats listing). This can be hanged from an arrow head formation (default for the swim) to a standard rank based list (default for other disciplines).
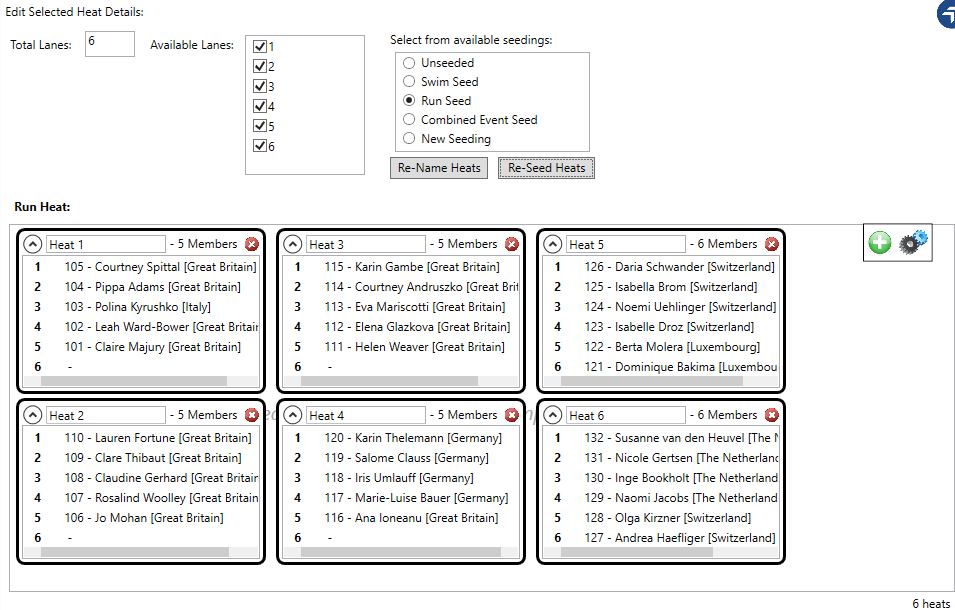
The scorcards will be generated based on the structure defined here.
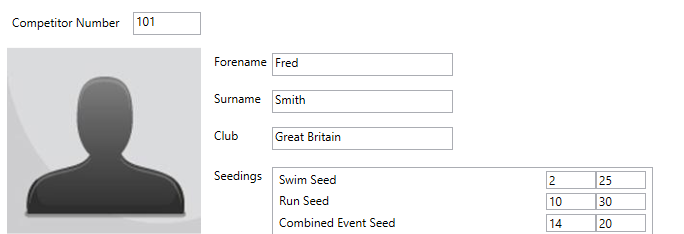
It is also possible to edit the seedings for individual competitors on the Event Details tab by selecting the appropriate class and then the competitor you want to edit:
Hors Concours
On the competitor admin panel there is a checkbox to make the competitor "Hors Concours" (i.e. engaged in the competition but not competing for a prize). The competitor will then be listed in results at teh borrom of the listing without being allocated place. If the competitor is decalred as being in a team then that team will get teh same treatment. Hors concours competitors will also be included in dynamic teams if this results in an extra team being made up. This team will also be considered Hors Concours and will display at the bottom of the listing without being allocated a place.Custom Point Adjustments
On the competition admin and class admin panels there is an custom adjustments button. This brings up a dialog which facilitates the construction of various rules to be applied in order to adjust the scores of either the teams or the individual competitors. For instance, you may want to apply only the best 2 scores in each discipline to the team or you may want specific disciplines for certain athletes to be excluded. In the case of competitions where an adjustment is required to teams containing certain competitors but the competitors' individual scores are not to be affected this can be applied.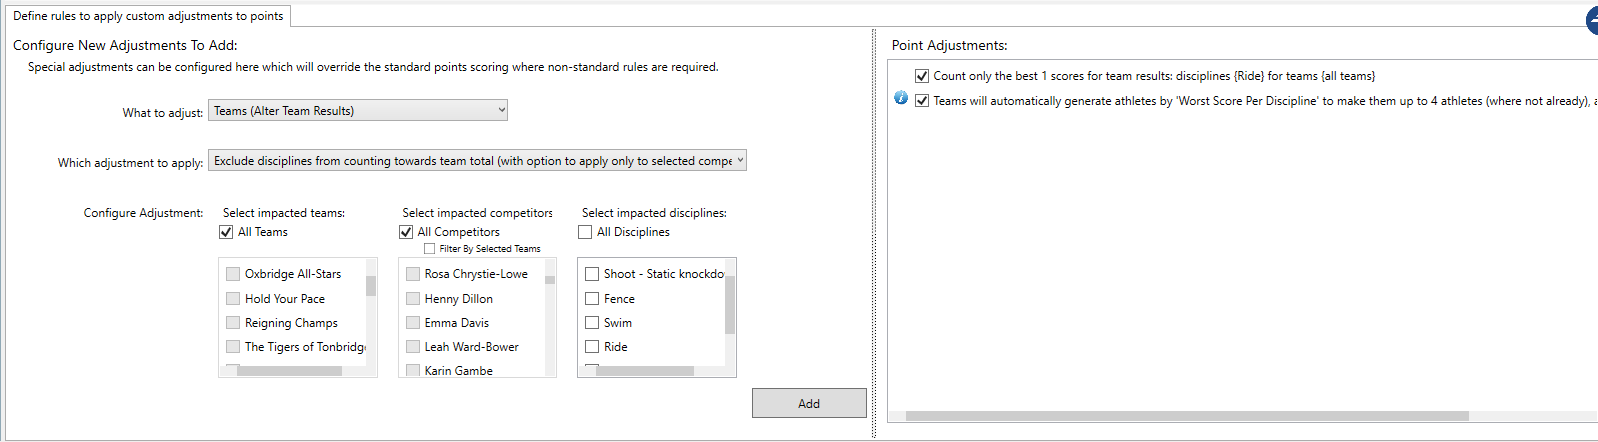
At the competition level adjustments can only be made to teams as individuals are only defined within classes.
- Team results can be adjusted in any of the following ways:
- Best n athletes to count towards team total (For example when some teams have only 2 competitors whilst others have 3 you may want to count only the best 2 athletes in the teams of 3 in order to make the results comparable)
- Best n scores from each discipline counting towards team total (For example when some teams have only 2 competitors whilst others have 3 you may want to refine the results to score the best two in each discipline so that no one individual is discounted completely from contributing to the teams and the teams of 3 have more benefit).
- Exclude disciplines from counting towards team total (with option to apply only to selected competitors) (Target specific competitor's disciplines and remove them from the team result. For example, if someone has participated in the ride just for practice and their ride score should display but not be counted towards the team total).
- Fixed point adjustment to apply to team score for each qualifying athlete: (For example, if there are mixed teams at competition level and you want to give a fixed number of points to every competitor in the ladies class. The BUCS competition has mixed teams, to compensate for the scoring systems being identical a bonus 350 points is awarded to the teams for each woman they contain.)
- Override final team score with predetermined fixed points: (For example, if there is some arbitrary decision been made by the competition director which cannot be set as a rule simple override the calculated score with a fixed number)
- Fill in missing athletes with auto-generated pseudo-athletes: (For example, if there are some teams of 3 and some teams of 4 we can define that all teams are of size 4 with the missing athletes created by taking the best score in each discipline)
- Competitor results can be adjusted in any of the following ways:
- Exclude disciplines from counting towards competitor total: (Target specific competitor's disciplines and remove them from the team result. For example, if someone has participated in the ride just for practice and their ride score should display but not be counted towards their total. The extra points applied can be derived as the worst score per discipline, the best score per discipline or the score of the weakest real team member).
- Override final athletes's score with predetermined fixed points: (For example, if there is some arbitrary decision been made by the competition director which cannot be set as a rule simple override the calculated score with a fixed number)
Total point calculation and display style configuration
On the class admin panel click the custom adjustments button, then select the tab labeled "Define how totals are calculated and displayed". Clicking this displays a dialog.

This allows the individual total result to be calculated using a subset of the available disciplines (for instance a tetrathlon results). It also allows for a secondary total to appear on the individual result report calculated using a different set of disciplines. Each can be given a name, the secondary total name will display on the results report for clarity. The option is also available to base team results on the secondary total, this is useful if, for instance, the individual competition is a pentathlon but the team compatition is based on tetrathlon results with the ride excluded (an alternative to creating a custom adjustment).
This dialog is only available at the class level an cannot be applied at the competition level.
Admin & Scorecard Reports
The scorecard ribbon allows for a host of reports to be generated

In order to generate the reports it is required to first ensure that the structure of the discipline is set up under the "event details" tab.
This entails slightly different information for different disciplines, in the case of the swim, the competitors are added from the class listing on the left into heat groups in the middle and then heats are either auto-generated based on seedings or manually created by dragging and dropping competitors:
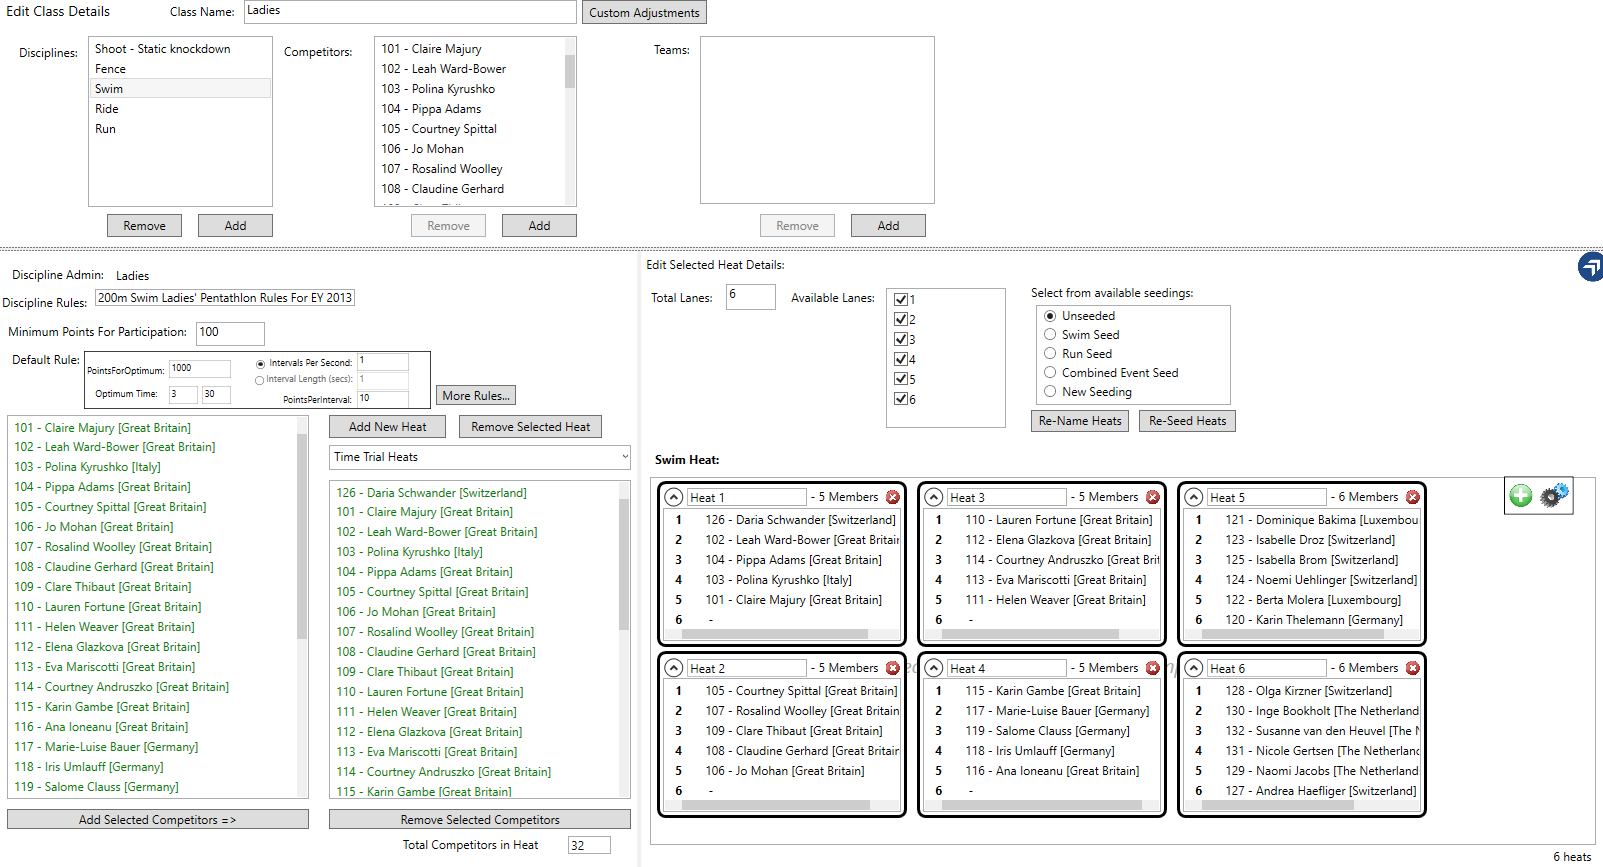
Similar dialogs allow shoot details, run heats, ride rounds as well as fence pools to be set up.
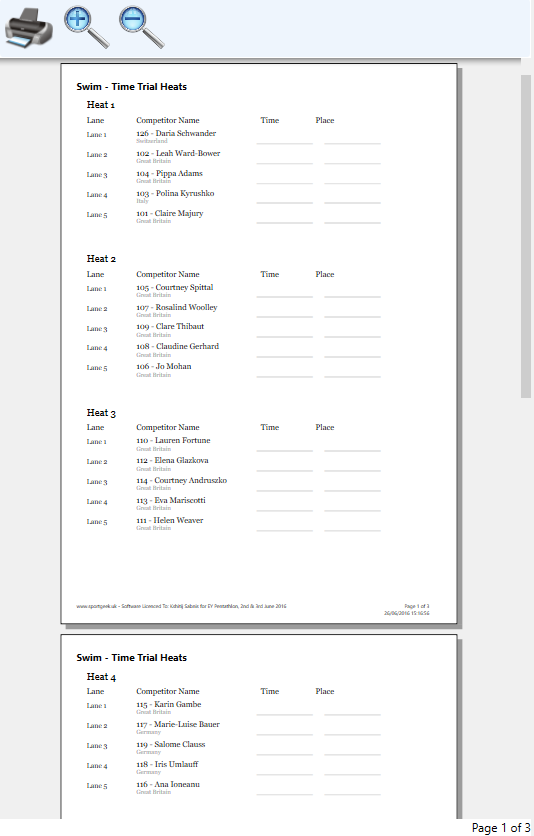
Back on the "Admin & Scorecards" Ribbon, reports are grouped by discipline. Public display reports show just the information about the structure with no spaces to fill in results so that they can be displayed for competitors to see the information.
The head scorekeepers reports are designed to capture all the results data round by round or heat by heat. Whereas, the lane scorecards are ordered differently so that each lane can have it's own timekeeper or judge recording the results heat by heat:
Fence Configuration and Pool Sheet Generation
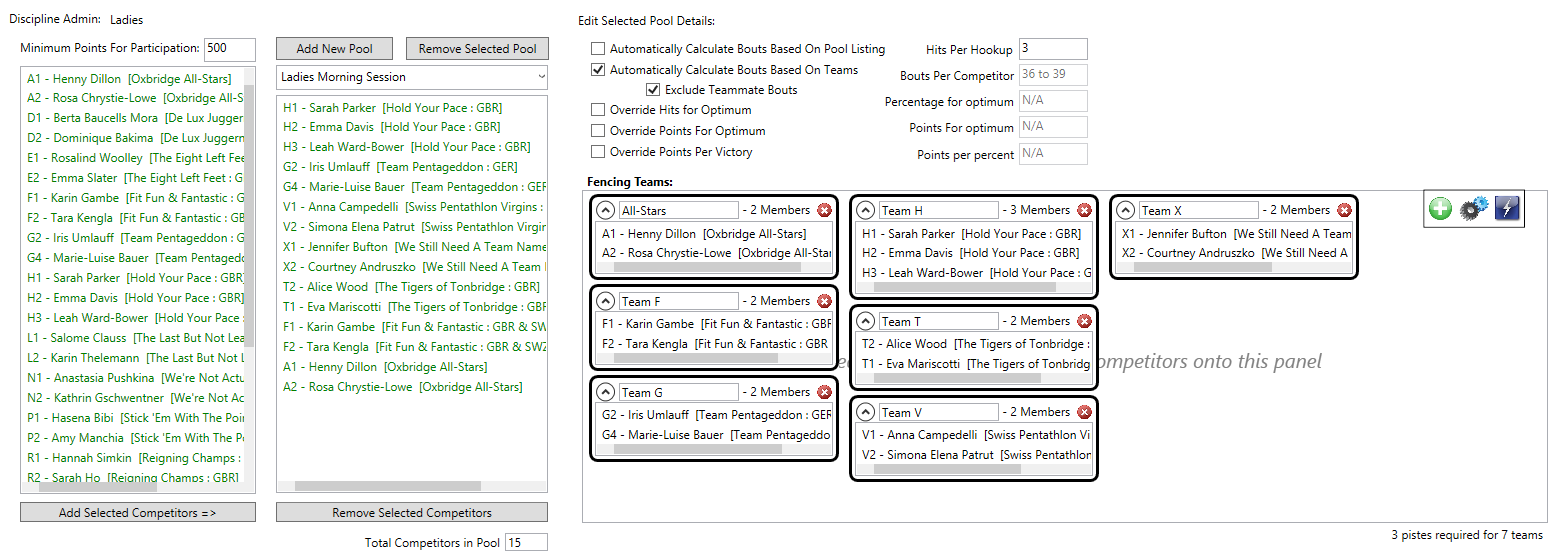
Clicking on the fence discipline from the class admin page will display the fence admin dialog in the lower panel. In the left hand listbox all the competitors in the current class will be displayed, in the second listbox all the competitors in the current pool are listed and on the bottom right is a panel with all the teams in the currently selected pool. It is worth noting that the pools are shared between all fence disciplines in the tournament so can be made up of any combination of competitors from any class.Competitors in the class list on the left that are not yet in a pool are coloured grey, once they have been added to a pool they turn green.
Fence rules can be selected and editied for the discipline by clicking the "Fence Rules" button.

This will bring up the following dialog:
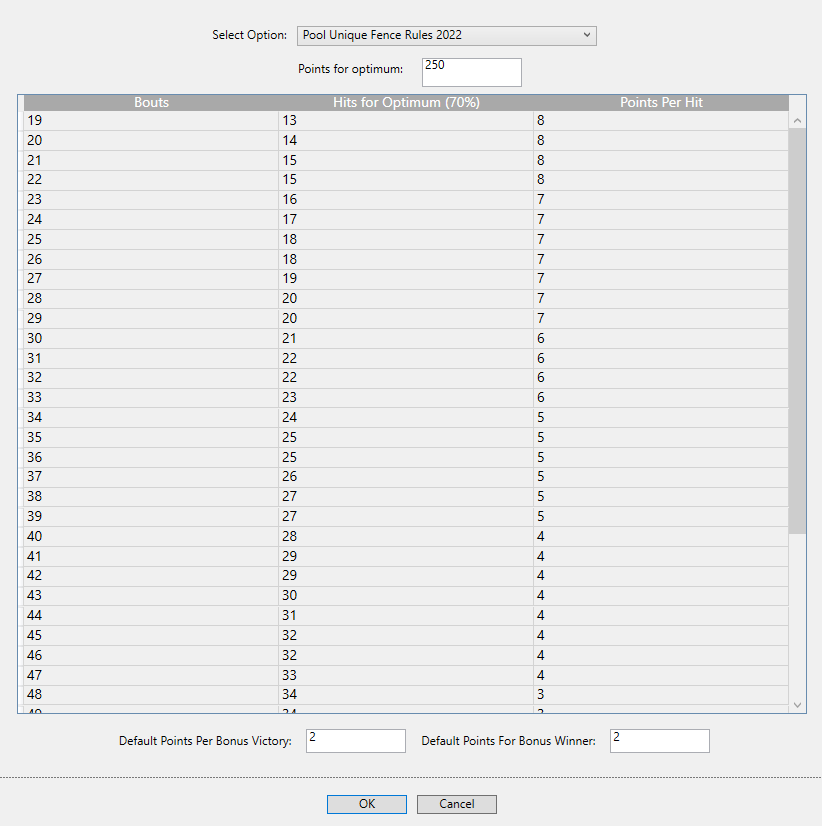
This dialog allows predetermined rules to be selected from the dropdown control at the top. These will apply to athletes in the currently selected fence discipline. Unless overridden on the pool that the athlete is fencing in (as described below).
Additionally, the selected rules can be edited. Values can be changed, rows can be inserted and deleted. To insert a row either press the insert button on the keyboard which a row is selected or right-click on the row to bring up a context menu with the option to insert. Similarly deletion can be done either from the delete key on the keyboard or using the context menu.
When edits are present a yellow warning triangle will appear next to the combobox to indicate that the rules are not the standard defaults. To reset the rules to a standard default select again from the combobox. A warning will show to indicate that changes will be lost.
Athlete by athlete fence rules will be determined using those defined on the instance of fence discipline that they have been entered from with any overrides applied according to the pool they are in. Typically this will be simply the same for everyone competing but it does allow for a great flexibility if a class is split into mutiple pools or if classes are combined into one pool. Rules can still differ by discipline (and thus by class) and by pool.
It is possible to have more than one fence discipline added to a single class. In this [unusual] scenario competitors who are entered into the currently selected pool for a different fence discipline are coloured brown.
Pools can be added by pressing "Add New Pool" and a new pool called "Pool Unique" will be created. This can be renamed from within the combobox. Once you have a pool created competitors can be added either by selecting them in the left hand class list and clicking "Add Selected Competitors" or by dragging and dropping them into the pool competitors list.
Similarly, teams can be created by selecting competitors from the pool and dragging and dropping them onto the fencing teams panel in the groups that you want to make up the teams. The competitors in the pool will turn green as you do this to indicate which competitors are already in a team and which need allocating.
Team names can be edited directly in the fence team controls, the number of members in each team is displayed and teams can be deleted by pressing the red button. Competitors can be dragged and dropped between teams and new teams can be created by dragging them onto the spare space on the fencing team panel.
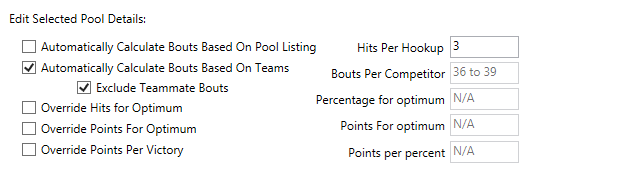
Above the fence team panel are controls to allow customisation of the scoring rules for the fence. Automatically calculate the bouts based on pool listing uses the list of athletes entered into the pool listed in the center of the fence admin panel. Automatically calculate the bouts based on teams uses only the athletes that are entered into fence teams. Clicking exclude teammate bouts assumes that athletes do not fence athletes in the same team; in this case unless all the teams are of the same size the number of hits will vary, the bouts per competitor are calculated individually and displayed on the input screen and a range is shown in the textbox here (i this case 36 to 39). The calculation of each of the optimum hits, points and points per victory can be overridden individually if required. It is important to enter the hits per hookup in the case where more than one hit is required.
In the top right hand corner of the fence team panel there is a small tool bar. The white cross on a green background can be used to create a new team, although this is rarely required as dragging competitors onto the fence team panel directly creates a new team.
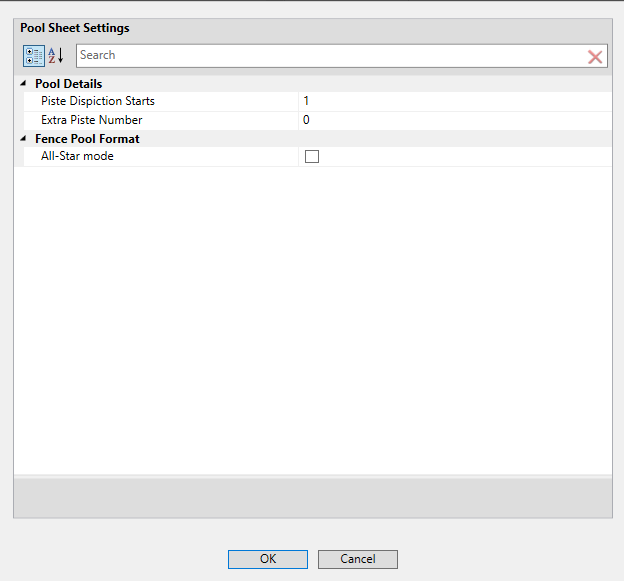
The cogs button brings up a preferences dialog allowing various customisation of the pool which do not affect the scores. Piste depiction can be set to start from any number so that if you have two pools fencing at the same time the second pool can start from piste 4, for instance. The extra piste number is used in the case that there are an odd number of teams and the team resting in the first round does its internal fights on this piste. The "All-Star mode changes the order of the team rotation to ensure that the first team remains on the same piste and each team has a rest round just prior to fencing them; this is only implemented for exactly 9 teams otherwise normal team rotation will be assumed.
The third button looks like a lightning bolt and brings up a quick preview of the pool sheets, however, pool sheets cannot be printed from here.
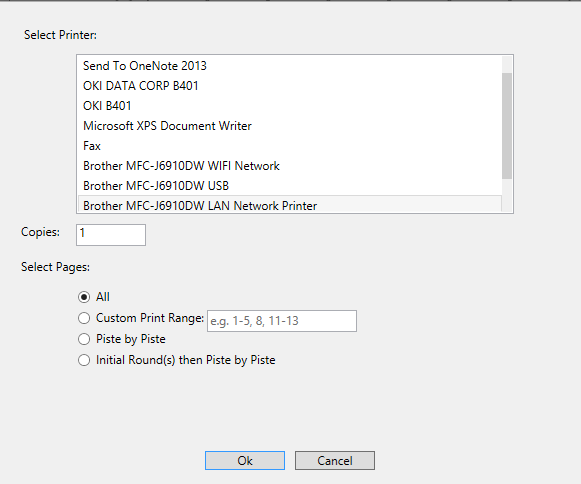
To print pool sheets you need to go to the "Admin & Scorecard Reports" ribbon and click "Generate Fence Pools"; you'll see that you can also print a piste rotation sheet to display on the wall so that athletes know which piste to go to for each round.
Once you have generated pool sheets, click on the print button to bring up the print dialog. Several custom page ranges are automatically configures, you can print all to print round by round, select a custom print range by page numbers, print piste by piste (useful in order to have ready collated pool sheets for distribution to referees) or print the first round and then print the rest piste by piste (this is useful if you are running out of time or have a slow printer and need to get the first round out quickly so that the fence can begin).
Fence Bonus Round
If a ladder-style bonus round is part of the fence event then this can be easily enabled on each pool:

The points awarded for each victory in the bonus round can also be set here. The winner of the bonus round (i.e. the last person standing) can also be given extra points defined in this dialog.
From the Admin & Scorecard Reports ribbon tab it is possible to select to print a bonus round judge's scorecard (which includes a slot for the final winner) and a public startlist (which excludes the winner's slot)
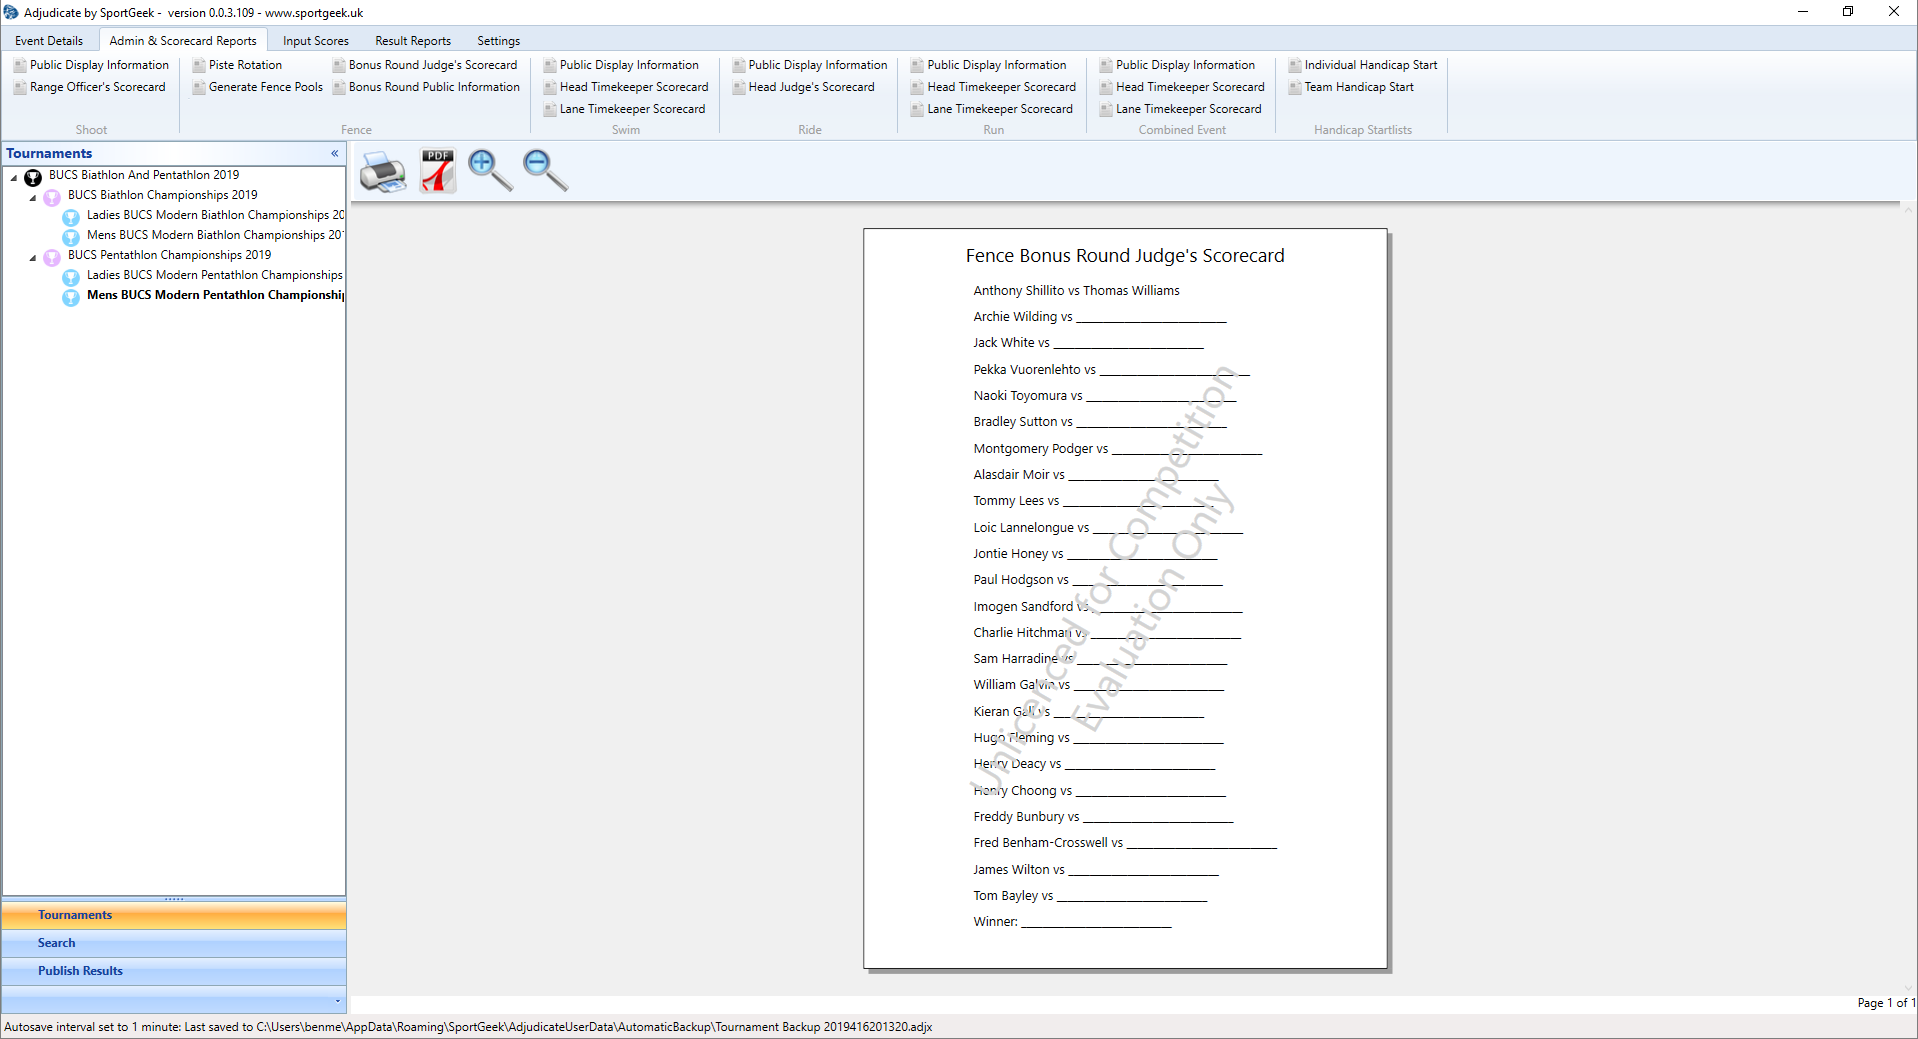
Once the bonus round has been enabled, the fence input for each competitor that are members of this pool will have an additional input cell for the bonus round victories to be entered:
The winner can be set by checking the checkbox in the bonus cell. Only one winner can be assigned in each pool.
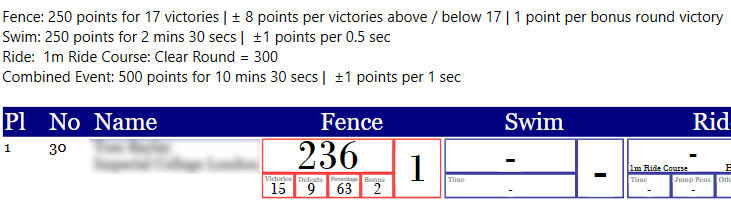
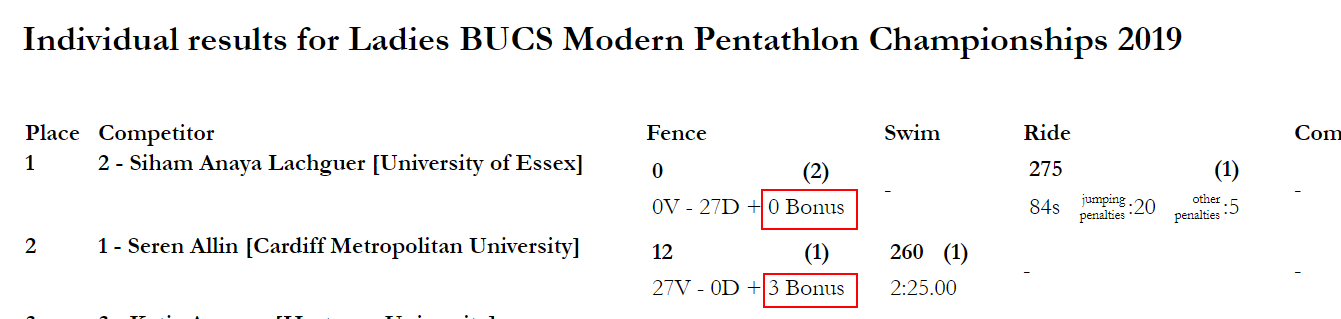
The printed results will append the points per bonus point and the points for bonus winner to the rules header and an extra cell with the number of bonus victories will appear for any competitor in a pool with a bonus round. The bonus points will be added to the fence points, the placing will be based on the seeding round. The winner will be awarded the points as defined in the admin dialog and an astrix will be added to their result to indicate they were the winner on the printed results.
By selecting the appropriate checkbox it is possible to display the bonus round startlist on projector, big screen or on the internet.
The startlist is displayed as shown:
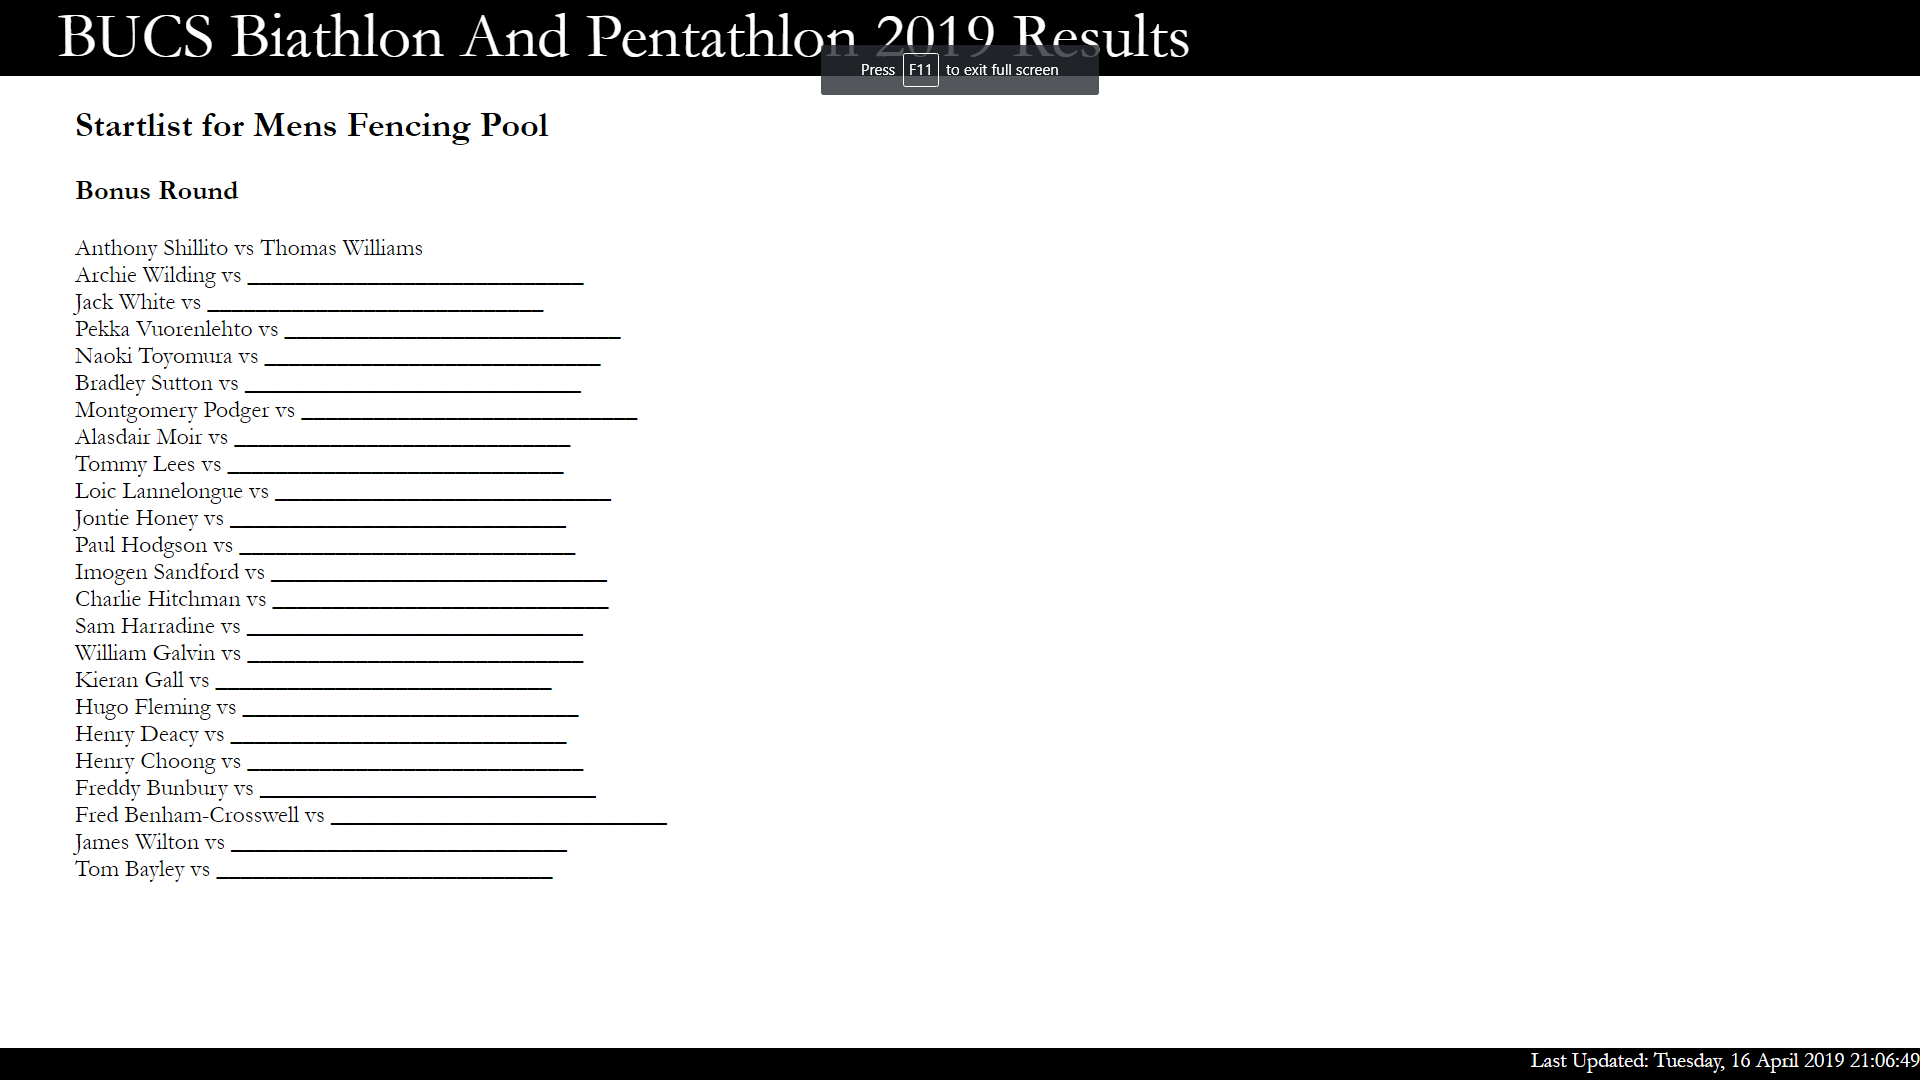
When results are published, the bonus round is included:
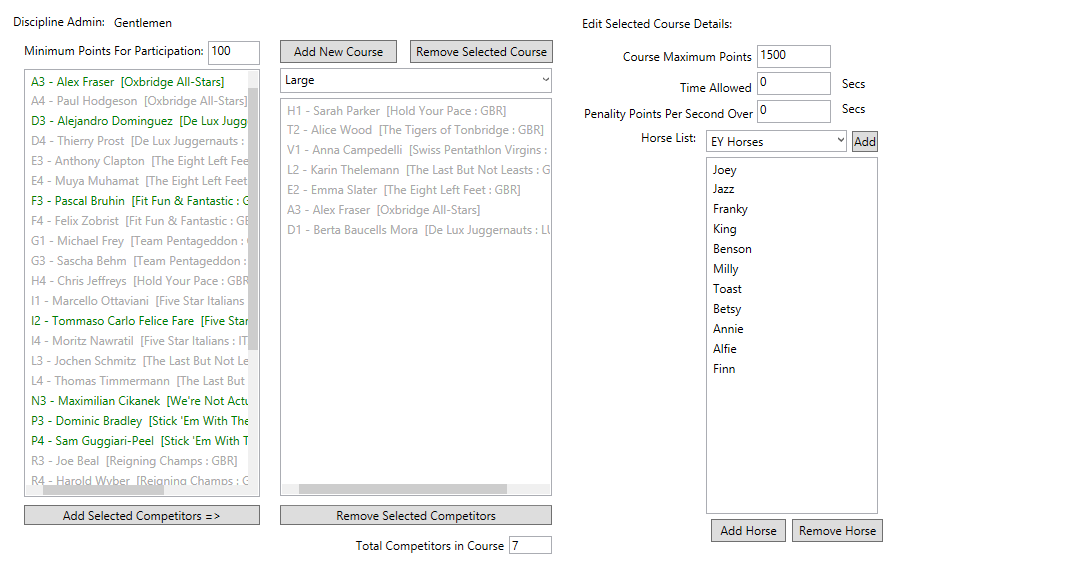
Ride Configuration, Courses and Horses
The ride admin dialog has similarities with the fence admin dialog. The current class competitors are listed on the left. Courses can be defined in the middle and the points system and horses can be defined on the right.
Competitors should be entered into a course (done by either using the buttons or by dragging and dropping), competitors who are allocated to a course are highlighted green.
You may only want a single course or you may want to add courses in order to have different jump heights, different horse lists or different scoring. The courses are shared across the tournament, meaning competitors from different classes can be allocated to the same course.
The time allowed should be set so that the time penalties are calculated correctly. Horses are optional and will display on the results if set. Both the course a competitor is in and the horse they are riding can be set directly on the input screen.
Both the riders in the course and the horses themselves can be reordered by dragging and dropping, this is particularly useful when using Adjuducate to perform the ride draw. For example, putting the horses and riders in exactly order you want then to go in and assigning horses accordingly with no randomness.
Ride Draw and Ride Particulars Import
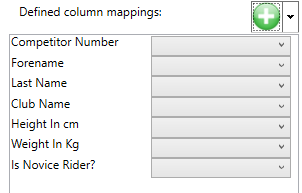
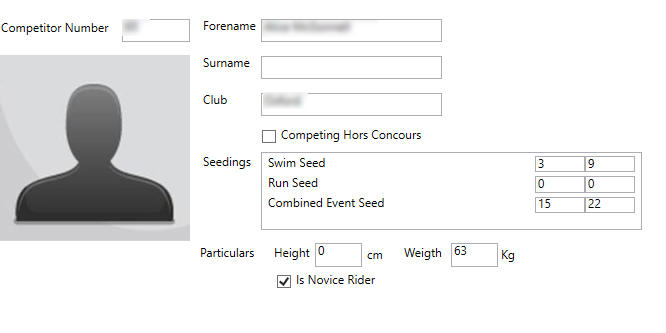
On the competitors import dialog the green plus button that allows seeding columns to be added also allows a competitors "particulars" to be entered. These compose of their height, their weight and whether they are a novice rider. This information is sensitive so should not be published.
Once "Ride Particulars" have been selected from the drop down click the green button to add the three columns for height, weight and is novice rider. Height should be an integer representing cm, weight should be an integer representing Kg and is Novice can accept "true"/"false", "1"/"0", "yes"/"no" and "novice"/[whitespace]. If your data is in any other format manipulate this externally before importing.
Once imported the values can be edited in the competitor admin dialog:
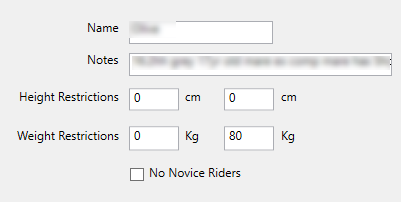
Each horse which requires restrictions can have them added individually. Height and weight can accept both a minimum and maximum value, typically only the maximum will be required but in the case of large horses and small competitors minimums may be desired. Values left as 0 will be assumed to be unrestricted. Horses with "No Novice Riders" checked will only allow compeitor that do not have is novice checked. If this is left unchecked then the horse will be allowed both riders with is novice checked and those without:
The ride draw is performed in the ride admin dialog:
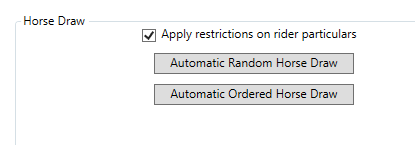
The "Apply restrictions on rider particulars allows a draw to be performed without restrictions applied, if desired. Typically if restrictions have been setup then one would want them applied, in which case ensure that this checkbox is checked.
The draw will always ensure that the order of the horses is maintained. In the case that random draw is performed the competitors will be shuffled onto random horses as is typically required. If the ordered draw is selected then the order of the competitors in the class is maintains and competitors are simply allocated to horses in turn.
So if, for instance, you want a generally random draw but you want someone in particular to ride first you can run the random draw, move the person you want to go first in to the first position in the course and then run an ordered draw to reallocate the horses correctly. If restrictions are not adhered to by the ordered draw some minor shuffling may take place but competitors will always be moved the minimum necessary amount of positions in the order.
Once a draw is completed you may see a dialog displaying some details of the draw. If there are too many restrictions on the horses the draw may struggle to adhere to all of them and will display a list of rides that are still allocated to horses which violate the restrictions. In the case of ordered draw the dialog the dialog may also display any positional swaps which have been made.
Handicap Starts
The admin & scorecard reports ribbon tab contains the option for either an individual handicap start or a team handicap start report to be generated. For the individual report, the points per second on which the handicap is to be based is calculated by searching for unstarted disciplines which could be used as a handicap (typically a run) and if only one is unstarted applying the points per second from this event. A dialog will display the points per second and how they were derived before the report is completed. The team handicap report is fixed at 5 points per second which is in alignment with the ernst & young competition as this is the only competition at which we are aware this report is used. If you require different functionality please use the contact page on this web site to let us know.
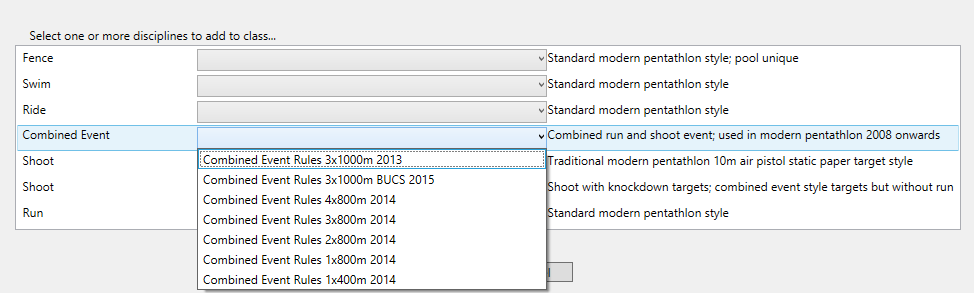
The Add New Discipline Dialog
When you add a discipline to a class from the class admin page you will see the following dialog displayed. You can select from the following types of discipline:- Fence: This is any pool unique fencing, typically one-hit epee. More than one hit, as is often required, is also supported.
- Swim: Any distance of swim with an optimum time and plus/minus points.
- Ride: Horse riding with a score for s clear round and penalties for faults.
- Combine Event: Combined run and shoot event.
- Shoot - Traditional: Traditional style precision target shooting, typically either 10 or 20 shots.
- Shoot - Static Knockdown: Using the knockdown targets from the combined event but without a run element. Typically 20 shots in 5 minutes.
- Run: Any distance of run with an optimum time and plus/minus points.
You can select disciplines to add by selecting from the list of rules, the row will be highlighted to indicate that this rule will be added. You can click elsewhere on the row to deselect the discipline to be added.
If you want to add multiple instances of the same discipline then you need to add the first instance from this dialog and then click add discipline again on the class and add the second instance.
Swim Run and Combined Event Scoring and "Secondary Rules"
The swim, run and combined event disciplines are all very similar and can be categorised as time based physical events.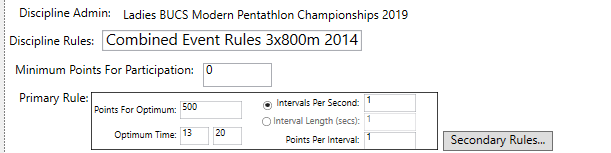
The discipline admin screen contains a default rule which in most typical usage is the only rule required. It allows the points for an optimum time to be selected (prior to 2014 this was 1000 points except for combined event which was 2000 points, since 2014 this has been changed to 250points with 500 points for combined event).
You can enter the time in minutes and seconds at which the points for optimum are applied.
Beyond this you can set the number of intervals per second (2 intervals per second is equivalent to 0.5 second intervals; 4 intervals per second is equivalent to 0.25 second intervals and 3 intervals per second uses the UIPM rules to apply 0.33 second intervals). If you want the interval to be greater than 1 second then set the interval length as desired instead.
The points per interval is set below. So, for instance, with 2 intervals per second and 2 points per interval the scores will vary from the optimum by 4 points per second, changing ever 0.5 second by 2 points.
Now, in some competitions there are different points per second for different bandings of time. For example, at the Ernst& Young event the gents swim is 10 points per second if you are faster than 3 minutes 30 seconds but 5 points per second if you are slower. This is to taper off the rate of points so that less-experienced athletes still get a meaningful score.
To achieve this the advanced details dialog defines override rules which, for a range of time, define a different rule which overrides the default rule. This can now be edited but this should be used with caution.
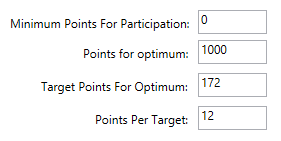
Traditional Shooting
The traditional shoot is a paper target precision shooting discipline usually with 40 seconds per shot. For a 20 shot shoot the scoring system is based around a 172 optimum, with 10 shots a 72 point optimum is usually applied. These can be customised in the shoot admin.
Static Knockdown Shooting
The static knockdown shoot has been included to enable an event to include the combined event style targets but without the need for the run and the shoot to be together. The scoring is partially like the time based physical; the points for optimum, optimum time and points per intervals work in the same way. However, there is also a deduction possible for target which remain standing at the end of the maximum time allowed, this is set in the points per target. So if there are 20 targets and someone gets 18 down in the maximum time of 5 minutes then they will score 900 points.
Minimum points for participation
Each of the disciplines' admin pages have a minimum points for participation option. This will be the minimum score possible so long as the competitor takes part (i.e. unless they DNS or DQ).Tournament Templates
Tournament templates are defined as the structure of the competitions but without the competitors and teams who would be specific to an event.
Templates are useful for the purpose of setting up and event for which you have the results from the previous year. You can read in the .adjx file from the previous year, then save it as a template, reload the template and as long as the competition director has not changed the rules being applied you are ready to start entering the new year's competitors.
Structure such as competitions, classes, disciplines, scoring systems, fence pools and ride courses will be maintained from the tournament.
There are also a selection of built in templates which can be accessed from the event details ribbon tab via the select from built in templates button. If you would like your own tournament template set up then use the contact page on this web site to let us know.
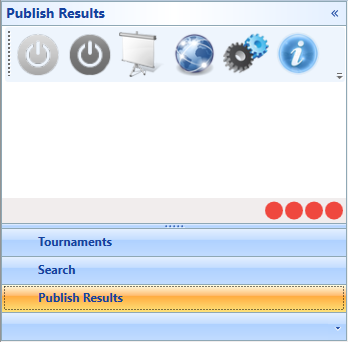
Publish Results (internet and venue display screens)
Adjudicate makes the job of displaying results on either projector or TV screens in the venue as easy as possible and similarly allow results to be published to the internet at the push of a button.
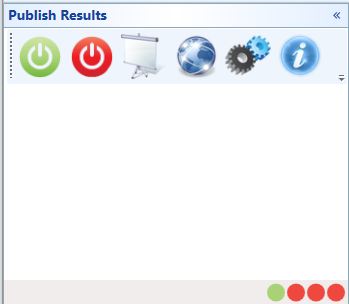
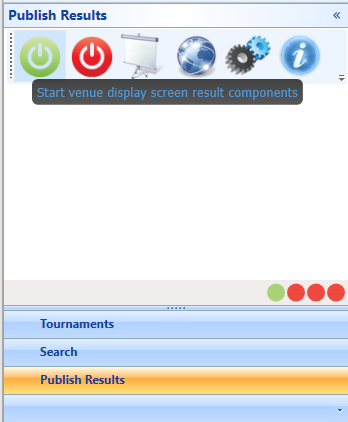
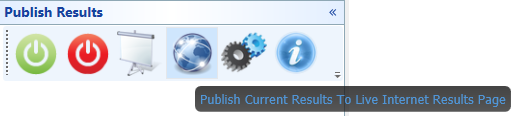
Selecting the "Publish Results" from the left-hand panel will bring up a publish results control with a number of buttons along the top toolbar and some "traffic light" status indicators along the bottom status bar.
In order for the first three buttons along the top to be available you must be running as an administrator. The first of the four status indicator traffic lights will be red if you are not currently running as an administrator and green if you are, the buttons will be greyed out and clicking the information button will display a message stating that you need to restart as an administrator .
Running as administrator can be done in the usual way in Windows. Alternatively, on start up, Adjudicate will check and, if not already running as administrator, prompt you offering to restart as administrator.
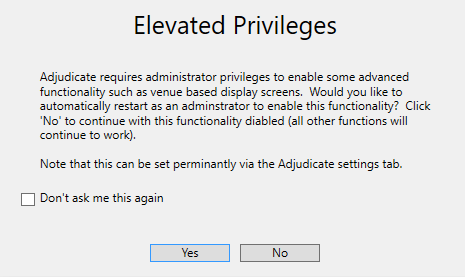
If you select "Don't show me this again" then you will not be prompted again and the option you have picked will be chosen in future when you start up. If you select to restart as administrator and not to be prompted again three consecutive failed attempts at starting as administrator will result in the software reverting to displaying the prompt. The option can also be set from the settings ribbon tab:

You do not need administrator rights in order to publish to the internet, this is only required for venue display screens because they work by hosting a local website and, optionally, turning the wifi card in your computer into a WiFi hotspot (useful for when no other network is available).
Now that you have admin rights the easiest way to publish results to screens around the venue is simply to press the green button on the left of the publish results toolbar at the top of the dialog.
With default settings, when you press the start button, all the status traffic lights will go green. In order the lights indicate that the following has happened:
- The first light indicates if you are running with the required administrator rights.
- The second light indicates if the WiFi hotspot is active.
- The third light indicates if a firewall exception has been enabled. This is required in order to allow the venue display screens to access results from the web server.
- When the fourth light is green it indicates that a web server is running which is broadcasting results on the network in order that web browsers on networked machines can show the results in a web browser (for best results use google chrome browser and press F11 to enter full screen mode).
Once the lights are green indicating everything is running you will need to go to the computer that you have hooked up to your display screen (this can be the same machine that you are running adjudicate on, or a different machine). The display screen's computer will need to be connected via a network connection; you can either set this up yourself or use the built in WiFi hotspot mentioned above.
In order to see the settings that are required for connection click on the information button to display the current network credentials and the location of the web site. There will be more than one way to connect depending on whether you use machine name or an IP address (if you are using the same machine you can even use "localhost").
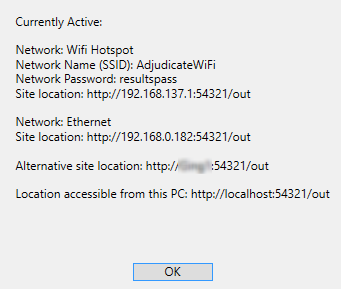
In the browser address bar type in any of the addresses (beginning with "http://"), the results should show and after a couple of seconds will begin scrolling. Go to full screen mode in your browser and show this on the venue's display screen. When results change there is no need to fully restart all the services, simple press the screen button:

This will perform a quick update of the results with whatever has been entered in the currently open tournament, you will see the display screen's browsers refresh when the scrolling gets to either the bottom or top and changes direction.
The results' web server can be disabled at any time simply by pressing the red stop button.
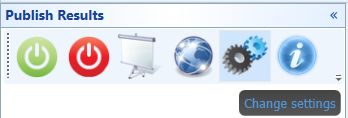
In order to customise the publication of results, press the settings button:
This will bring up the following dialog:
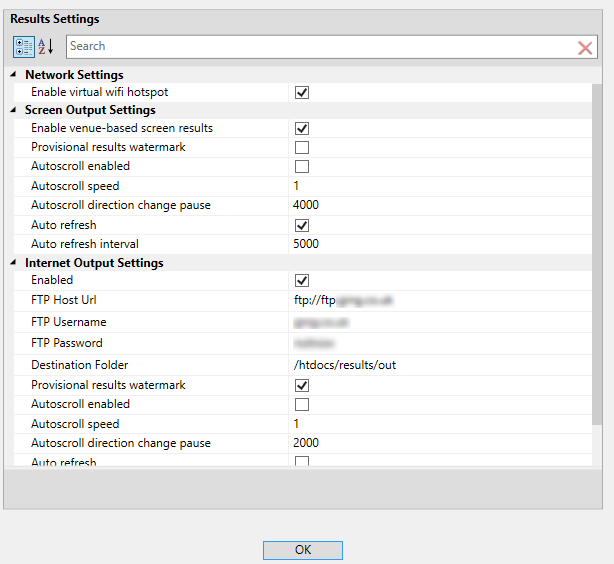
From here you can click on each setting in turn to see a brief description of what it does (displayed at the bottom). It is possible to enable or disable the Wifi hotspot (you might want to disable this if you are using another host network as you will then be able to stay wirelessly connected to the internet). You can watermark the results as provisional, switch the scrolling on and off and alter the speed and pauses on the scrolling. You can enable/disable the refreshing of the results by the browser and set the interval between refreshes (if the results are scrolling the interval will be ignored and refreshing will happen when the top or bottom are reached in order to maintain smooth scrolling).
You can also setup internet publishing here. You can point to your web site's ftp host, enter username and password and point to the specific folder on the ftp site that you want to publish to (ensure this folder exists and is empty). The same scrolling and refreshing is also possible on an internet publish but by default this is switched off.
Once you have setup your ftp credential you can update the internet results simply by pressing the internet results button.
The results will be published, in full, to the location you specified.
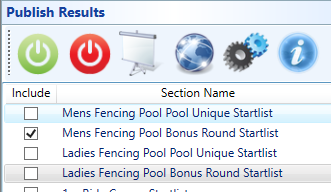
The content of what is published can be chosen from a list of all possible items as shown:
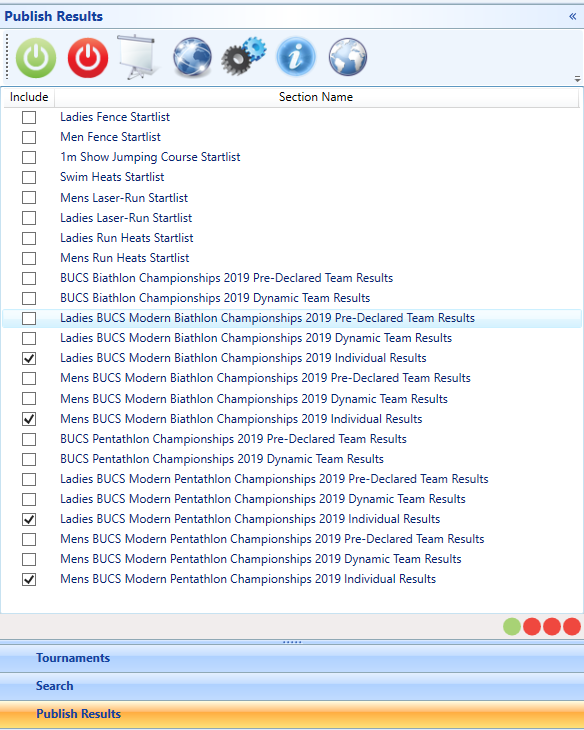
Startlists can be displayed for each event or results from each competition and class. The selection is stored along with the tournament.
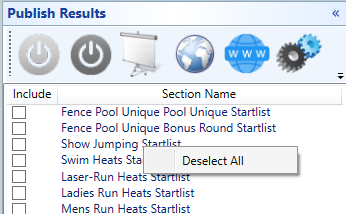
You can deselect everything by right-clicking anywhere on the list to bring up the context menu.
Uninstall and restore to previous state
From control panel:
1. Add/Remove programs or Programs and Features.
2. Right click on Adjudicate
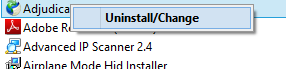
3. Option to restore to previous version is available if a previous version has been updated.
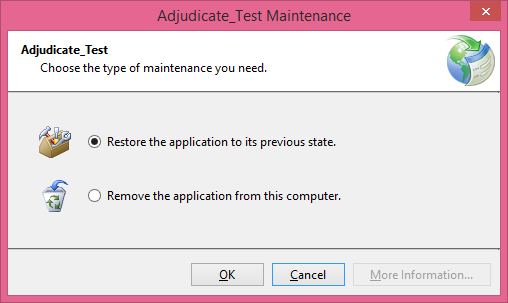
Warning: .adjx files created with one version of adjudicate may not be compatible with older versions of adjudicate.
Licenses
By default results output is watermarked as Adjudicate should not be used in competition without an appropriate license. Currently, Adjudicate is only available for testing purposes, any use in competition should be done with caution and with the direct support of the developer who can be contacted via the "contact" page on this web site.
If you agree to take on the risks of using pre-release software in your competition you will be issued with a license (.lic) file. This is an encoded file which removes the watermark and instead stamps the footer of each result output with text stating that the software is correctly licensed for you to use at your competition.
To apply the license file, go to the settings ribbon and click "Apply License", you will be prompted to locate your license file.
The file will be read and the new license information will be applied.
The currently active license information is stored here,
"C:\
(This is the location for Windows 8.1, other versions of Windows may vary)
You can see information associated with the currently applied license by going to the settings ribbon and clicking the "View License Info" button. Alternatively, generate a results output to view the license information as it appears on the page footer.